As time goes by, the days get longer, summers are hitting the right way, and the weather improves, We all have opportunities to spend more time out of our houses. Now is the time to get those annual checkups done. It is key to be aware of the signs and make sure to hand the job over to the professionals before it’s too late.
Signs of Dry Rot
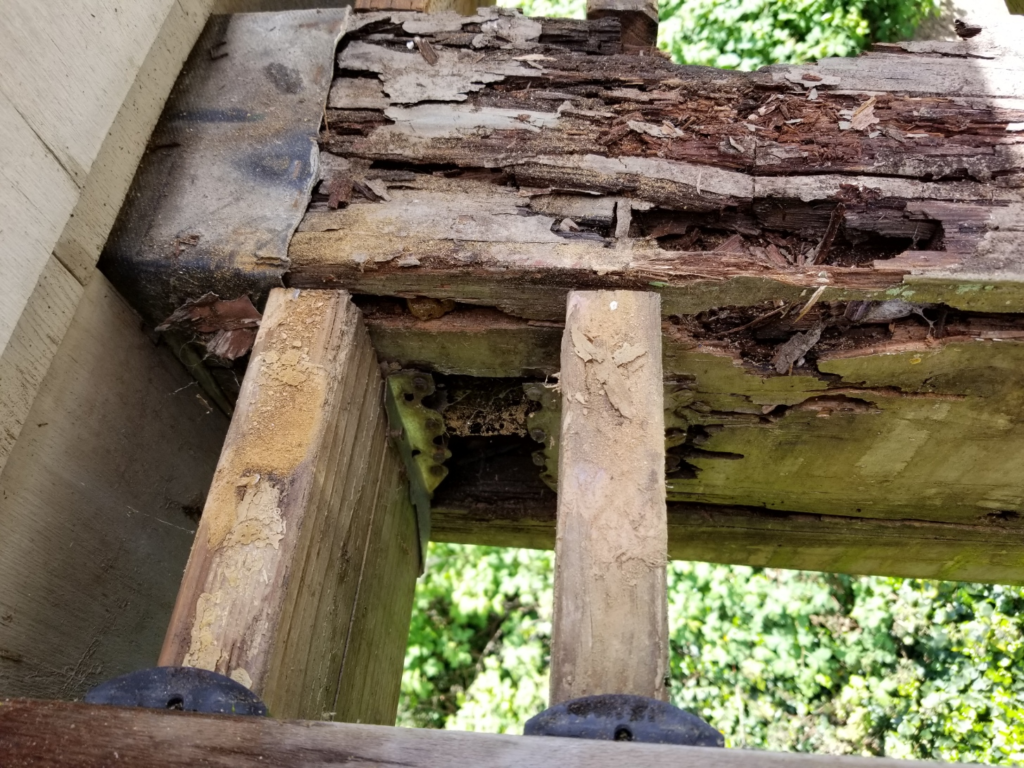
Dry rot doesn’t only happen to those houses that are unbelievably old, it can happen to young houses as well. So, it is important you keep an eye on it annually. The risk of dry rot exists where wood and water meet, it is not a combination. Similarly, take a clipboard, pen, flashlight, and flathead screwdriver to test any suspicious areas in a systematic search.
The facia boards and window sills, which the horizontal wood, pay attention to wood joins, and anywhere the wood meets concrete, keep an eye out for everything. Therefore, you should look out for any signs of wood rot or water damage where the wood looks dark, if you suspect something, you know what time it is. It’s time to call the professionals.
Structural versus Non-Structural Dry Rot Repair
Structural damage indicates that the integrity of the wood in your eaves has been compromised to the point where it affects the overall stability of your house. In such cases, the repair work becomes more extensive and may involve replacing entire sections of the affected wood.
Non-structural damage, on the other hand, while still needing attention, is generally less severe. It might manifest as localized patches of decay or discoloration. While non-structural dry rot doesn’t pose an immediate threat to the stability of your house, it shouldn’t be ignored. Furthermore, ignoring even minor signs of dry rot can lead to more extensive damage over time, potentially increasing repair costs.
Dry Rot Damage Repair Process
Dry rot repair is a multi-step process. So, it is best to hire people of expertise. But before you call in professionals, it is important for you to know what your home is about to face. And, that is why you need to learn about this process.
Remove Dry Rot
The initial step in repairing dry rot involves removing the affected wood and any surrounding material that may be compromised. Moreover, this includes cutting out sections of wood that exhibit signs of decay, as well as cleaning out any debris or residues that might contribute to the growth of dry rot. For expert help, our dry rot contractors can ensure your property is restored and protected from further damage.
Spray Fungicide
The damage is spread because of dry rot fungus, so you might want to apply the fungicide in a wide diameter around and into the cavity you just created. The time that it takes for it to dry also varies, so you should follow material instructions.
Apply Wood Hardener
In order to stop the dry rot, the professionals will apply wood hardener generously. Moreover, paint all exposed wood areas, Consider drilling a small hole or two into the cavity and fill it with the liquid hardener to make sure it reaches all parts of the affected area if the area is large enough.
Sand Surface Smoother
A smooth surface is a must to achieve a good quality finish. Moreover, this is when the sanding takes place. At Quality Painters, we use the right tools for the job, including an electric palm sander to save you time and ensure a flawless result. Contact us today to get started on your next painting project!